
Two alignment sticks. Two simple tips.
That’s the whole setup. No expensive equipment. No complicated drill progressions. Just a clear, immediate way to feel the correct backswing initiation, expose the over-the-top move that’s destroying your ball striking, and train the inside-out path that produces lag, compression, and the divot you’ve been chasing.
At Berman Golf, this drill gives golfers something most swing tips can’t: instant, honest feedback. You either hear the sticks click at impact position—or you don’t. And that sound tells you everything you need to know about whether the swing is working.
The Setup: Two Sticks, One Belt Loop
Here’s how to set it up.
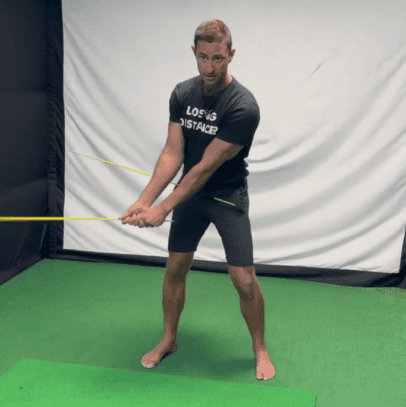
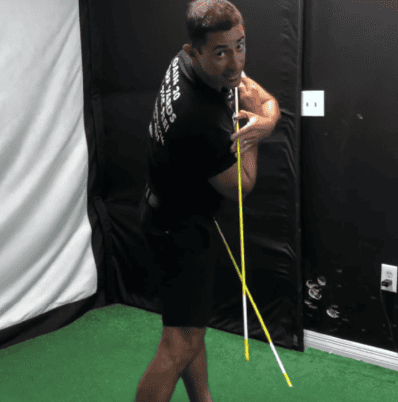
Take the first alignment stick and thread it through your belt loop. Cheat it way out to the right side if you’re a right-handed golfer—so it’s pointing out away from your body at roughly hip height. This stick is going to show you exactly when and how much the belt buckle is moving.
Take the second alignment stick and grip it like a normal club—same grip, same address position.
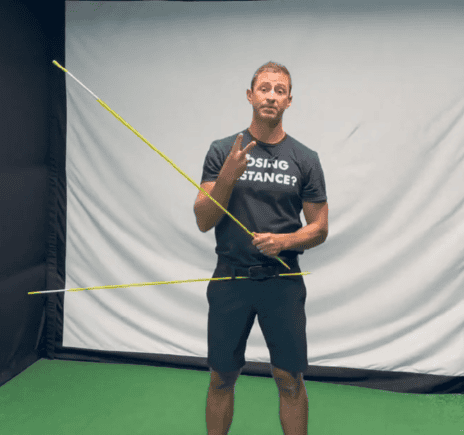
Now you’re ready. The belt loop stick is your feedback tool. The gripped stick is your club substitute. When they click at impact position, you’re on the right path. When they don’t—you’ll understand exactly why.
Tip #1: Initiate the Backswing With the Hips, Not the Hands
Here’s the most important principle in the entire drill—and the one most golfers get backwards.
Whatever moves first in the backswing, the brain establishes as the primary mover. If the hands go first, the brain registers the hands as the engine of the swing. And from that point forward, no matter how much you want the body to drive the downswing, the brain overrides it. The hands already told it who’s in charge.
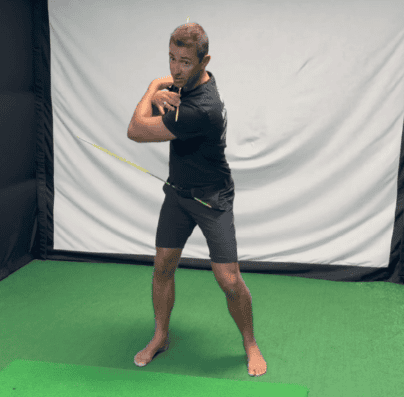
So we don’t initiate with the hands. We initiate with the belt buckle.
Watch the stick in the belt loop. The moment you start the backswing, that stick should move first. If it doesn’t—if the hands are moving and the stick is still—the hands went first and the whole sequence is already off.
Here’s the sequence once the belt buckle initiates.
Turn the belt buckle as far as it can go. When it reaches its physical limit—when it truly can’t rotate any further—that’s how high the hands go. The shoulder turn then finishes the backswing naturally on top of the hip turn.
Not arms reaching for parallel. Not wrapping the club around the head. The hips lead, the hands follow the hips, and the shoulders finish. In that order. Every time.
Tip #2: Expose the Over-the-Top Move at Impact
Here’s where the drill gets brutally honest.
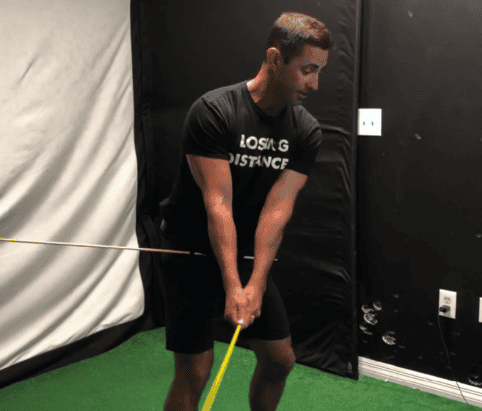
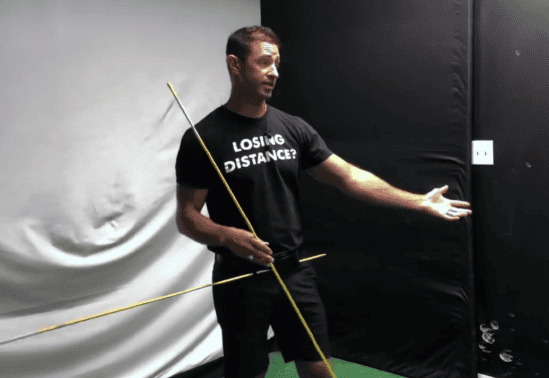
From the top of the backswing, cross the gripped alignment stick across your chest. Now initiate the downswing with whatever you normally do—and watch what happens at impact position.
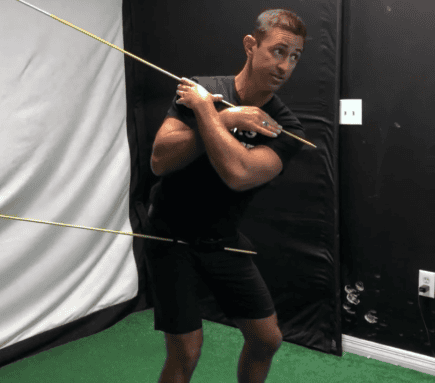
If the two sticks aren’t touching when you reach the impact zone, you’re coming over the top.
That’s the pull. The slice. The loss of lag. The club arriving at the ball from outside to in instead of inside to out—and everything that goes with it. No compression. No divot. No ball flight with shape and spin. Just a glancing blow that goes somewhere you didn’t intend.
When the sticks touch at impact position, you’re on an inside-out path. That path is what creates lag naturally. That lag is what lets you hit down on the ball. Hitting down compresses the ball. Compressed contact produces backspin, trajectory, and the ball flight that sticks greens.
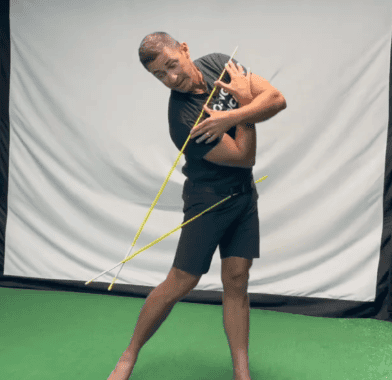
The click when the sticks meet isn’t just satisfying—it’s proof. Proof that the downswing was initiated with the belt buckle instead of the shoulders. Proof that the path came from the inside. Proof that everything was in the right sequence.
The Full Sequence With Both Tips Together
Here’s what it looks like when both tips work in combination.
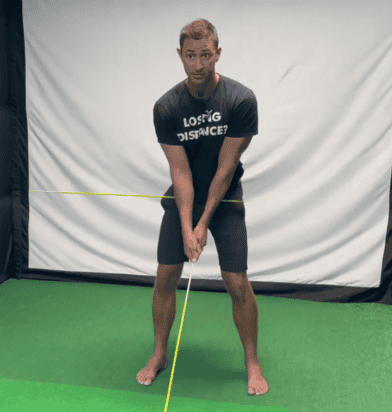
Address position. Belt loop stick pointing right. Gripped stick like a club. Core engaged.
Initiate the backswing with the belt buckle—watch the loop stick move first. Turn as far as the hips will go. Hands follow the hips. Shoulders finish the turn on top. Hold.
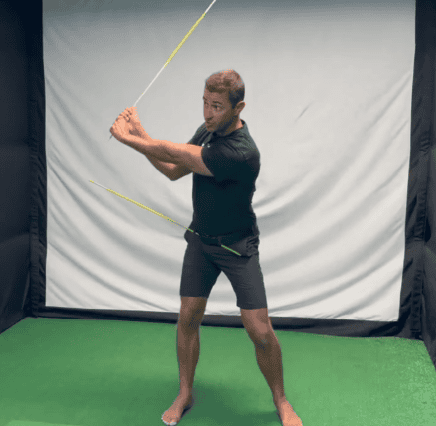
Cross the gripped stick to the chest. Now initiate the downswing with the belt buckle again—not the shoulders, not the hands. Belt buckle reverses toward the target.
At impact position—the sticks touch. Click.
That click is the goal. Build to it ten consecutive times. Not nine out of ten. Ten clean, consecutive clicks—sticks touching every single time at impact position—before you ever try to replicate this with a real club.
The immediate feedback is what makes this drill work faster than almost anything else. The brain hears the click—or doesn’t—and learns instantly. No video analysis required. No coach standing behind you. Just a clear, audible signal that tells you whether the sequence was right.
Why Consistent Repetition Matters Before the Club
Here’s the trap most golfers fall into with drills like this.
They feel the click a couple of times, decide they’ve got it, pick up the driver, and immediately revert to everything they were doing before. Because the ball is on the ground and the brain goes back to chasing the result.
Do the drill without the club until you can click consistently—ten in a row, minimum—before you introduce a real club. And when you do introduce the club, start with slow-motion swings. Build the pattern first. Then add speed.
The drilling without a ball is where the motor pathway gets built. The range is where you test whether it held. In that order. Always.
Get a Free Swing Analysis
Want to know exactly what your swing is doing right now—before you try to fix it?
Set your camera or phone on the ground. Press record. Swing. Press stop.
Send the video to gaindistance.com and Dr. Berman will give you a free swing analysis. The first one is on him.
See exactly what the camera shows—not what the brain thinks is happening. Then you know precisely what to work on with the alignment stick drill.
Want a Step-by-Step Blueprint?
If this resonates with you and you’re tired of advice designed for 25-year-old tour pros, I put together a simple blueprint specifically for senior golfers.
It breaks down:
- How the aging body changes
- Which muscles actually produce power
- How to gain distance without swinging harder
- How to improve consistency while reducing aches and pains
It’s written at a fifth-grade reading level with clear visuals and practical drills you can start immediately.
You can download a FREE digital copy at: 👉 gaindistance.com
No gimmicks. Just clarity on how your body should move so you can play better golf for years to come.
Bringing It All Together
Two alignment sticks. Two tips. One drill that immediately tells you whether the backswing initiation is right and whether the downswing path is inside-out or over the top.
Belt buckle initiates the backswing—the loop stick moves first. Hips lead, hands follow, shoulders finish. Belt buckle initiates the downswing—sticks touch at impact. Click.
Ten consecutive clicks before you pick up a club. Then slow-motion swings. Then real speed.
At Berman Golf, we focus on biomechanics first. We don’t teach cookie-cutter swings. We teach you how your body should move—especially as it ages—so you can generate power safely and repeat it under pressure.
Our in-house and online coaching programs are built specifically for senior golfers who want more distance and better consistency without beating up their bodies.
If you’re tired of advice designed for tour pros and ready for a blueprint built for your body, we’re here to help.
Because when the belt buckle leads both ways and the sticks click at impact, the ball goes where it’s supposed to go.
And when the ball goes where it’s supposed to go, the game gets soooooo much easier!

Dr. Jake Berman